Using the Gradebook
The Gradebook feature can be accessed in the left menu of each Course Profile. Assignments, tests/quizzes, and discussions may be graded directly in the Gradebook. Students can view these grades under their Grades tab as you post them.
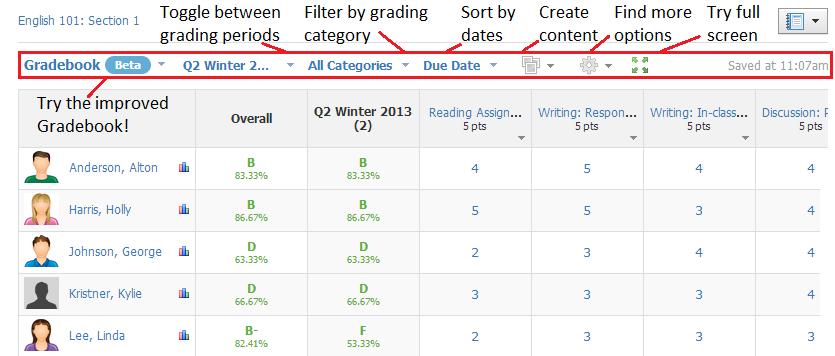
There is a row of options at the top of the Gradebook that give you flexible control over displaying content, creating new content, and setting various options. From left to right:
- Gradebook toggle— You can switch between the following options:
- Badges
- Mastery
- Attendance
Note: Depending on the settings at your school, some of these options may not be available
- Grading period toggle— You can change which grade items are displayed based on grading period), or view items for all grading periods
- Categories toggle— You can filter the Gradebook to only show grade items that belong to a particular grading Category
- Column sorting toggle— You can adjust the order in which the grade item columns are displayed:
- Due Date
- Date Created (Newest First)
- Date Created (Oldest First)
- Create content button— You can create graded content directly from the Gradebook:
- Assignments
- Test/Quizzes
- Discussions
- Grade Column (no associated course material necessary)
- Options button— You can access a menu of additional options for the Gradebook
- Full Screen— You can choose to display the Gradebook in full screen
Editing Grades (Now with Auto-save!)
Grades will automatically save in the Gradebook after you modify each grade cell. To edit grades for assignments and discussions, simply click on each cell and enter a grade. You can use the “X” character on your keyboard to give the student the max points for the assignment. For quick navigation, use the tab or arrow keys on your keyboard.
If the test/quiz is automatically graded, the grade should already appear in the cell. When you change any grade for a test/quiz, this change is considered a grade override, which is indicated by an orange color. Clicking on the lock icon will clear the override.
Using the dropdown menu located by each Assignment and Test/Quiz, you can:
- Edit— Modifies the item Profile.
- Track Revisions— Shows changes made to a student's grades.
- Set All Grades— Fills all of the grades with a single value.
- View Statistics— Shows statistics for an Assignment or Test/Quiz.
- Delete— Removes the Assignment, Test/Quiz, or Discussion from the course section.
Note: Not all of these options are available for Test/Quizzes.
Hiding Overall and Grading Period Columns from Students and Parents
Depending on how you’ve set up the Final Grade Settings section on your Grade Setup page, you can choose to not display overall grades or grading period grades from your students and their parents. In the Automatically Calculated Grades section:
- Select Hide overall grade from student report card if you do not want the Overall grading column to display in student report cards, or student overall grades to display in any reports seen by parents.
- Select Hide grading period grades from student reports if you do not want Grading Period columns to display in student report cards, or the student grades for grading periods to display in any reports seen by parents.
Adding a Custom Overall Grade Column
You can also add a custom grade column to your gradebook from the Final Grade Settings section. Enable the Add a custom overall grade column checkbox in the Custom Overall Grade section to add the custom column next to the Overall grade column. If you enable this feature, your gradebook displays both a custom overall grade column and the calculated overall grade column.
Notes:
Notes:
- Changes in the custom column do not affect the calculated grade.
- Custom column grades display in student report cards and any reports seen by parents. Grades in the calculated column are not visible to students or parents.
Comment
To leave a comment, follow these steps:
- Hover over a cell until you see a Comment Icon (it should be immediate).
- Click on the Comment Icon.
- Enter a message into the popup.
- Check the box to Display to Student (optional).
- Click Save Changes at the bottom of the page.
You may also place an Excused or Incomplete placeholder in a grade cell. These icons are marked in green and in red. They do not add value to the student's grades, but act as empty grade cells.
You cannot use Excused or Incomplete placeholders for Tests/Quizzes, however.
Note: Comments and placeholders will appear in the student grade report (see the Graph Icon located to the right of the student's name). Comments for grading periods and the overall column will also appear on student report cards.
Bulk Edit
The Bulk Edit option in the Options button of the Gradebook allows you to view graded assignments, tests/quizzes, and discussions in a given course. You can edit or delete the following information for each:
- Name
- Published/Unpublished (the green dot)
- Category
- Max points
- Factor
- Scale
- Due date
- Grading period
- Desc. (Description)
Note: Remember to Save Changes!
Print Grade Reports
You can print the Grade Reports for individual students in your course by clicking on Print Grade Reports found under the Options button.
Export
You can export your Gradebook into 2 formats:
- As an XLS/CSV version of your Gradebook
- As an XLS/CSV file that can be used to import into other systems
Import
If the graded items in one course are the same as the graded items in another course, you may even import grades from an XLS/CSV file. Note: This is only available to Enterprise instructors.
Grading Groups
We've also added a feature to grade members of your course in Grading Groups. This feature is best applied when your course already has members and graded items. To learn more about Grading Groups, visit the PowerSchool 'Getting Started Guide for Schoology Learning Customers' article.